Oil Spillage
Posted on August 15, 2020 • 5 minutes • 895 words • GitHub
Table of contents
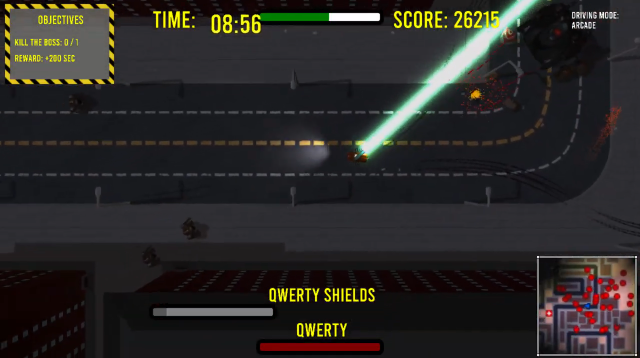
Oil Spillage was my first big project with a total of 11 members. We were a group of game programmers and technical artists who were divided in different groups with different focus. My group was called the “graphics engine” where me and one other classmate was part of. We planned to have each object added to the engine before drawing instead of each frame to maximize performance. When the first triangle was on the screen I started to implement meshes and textures for the objects.
The game needed particles for damage and weapon effects so I started to plan and develop the particle system which was a new challenge for me. It had to be on the GPU for performance sake and that was also a new area for me. A particle handler for multiple particle system with save and load for each particle system and a editor created with imgui. I also modified the particle system to create wheel tracks. After the particle system I created shadows for the engine with both spot and directional light support. Since the game was top down I could assume that for the shadows and use an easier and faster equation.
Apart from the shadows and particle system I also helped with the game logic, UI for the car parts, some modeling and some texturing.
Tools:
- C++
- DirectX 11
- Particle system
- Visual studio
- Visual studio graphics debugger
- RenderDoc
- git (source control)
- Google sheets (task tracking)
Particle system
The system needed to be on the GPU for fast performance and for this I needed to learn how to use compute shaders. For this I had a book Practical Rendering & Computation with Direct3D 1 that taught me how to use them and call them from the CPU side with DirectX11. The book also had a section with particle systems which I could use for inspiration.
The particle system has three parts to it, Add, Update and Rendering. The image below shows the whole process of the system. First frame we see the particles getting added to the first buffer and then updated and placed in the second buffer. Lastly the partciles are rendered. The next frame the buffers switches places and repeats the previous steps.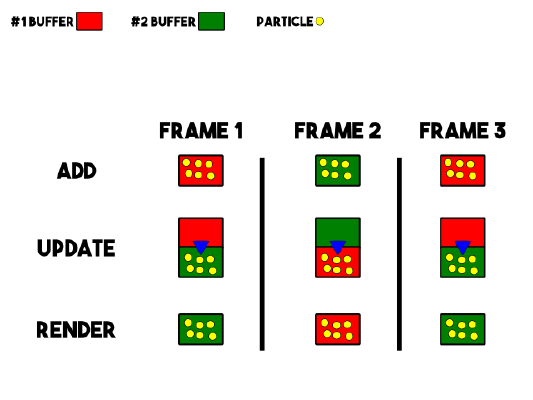
Add
Add dispatches an compute shader which uses a constant buffer that has the initial values for the particles position, direction and a vector with random values. The random vector is used for a generated direction which makes each add more random. The total lifetime for the particle is position w/a value. This is then added to the AppendBuffer and repeated for each particle added.
Update
The physics is done in this part and uses a compute shader that has two buffers, one append and one consume. Deltatime is added to the particles lifetime and if the lifetime is less or equal to zero we don’t append it and it dies. If lifetime is more than zero we start to calculate the gravity force applied to it and each particle has a mass and gravity value to make it more flexible. Vectorfields are also used for a more lively particle where a size and force value are used. Force to manipulate how much the field should influence the particle and size for how big or small the field should be. These two forces are then added to the velocity of the particle and then the velocity is added to the position multiplied by the delta time. To enable collision with the ground a ground y value was used to check against the particles position.
Rendering
At first the particle system used a geometry shader to generate the vertices but because the geometry shader is known to be slow I decided to remove it and only use Vertex and Pixel shader. Three vertices are used to create a triangle that gets rotated each frame. This creates the illusion of a star at 30 fps with big particles but when the particle is small it looks like a circle. I saw this approach on Edan Kwans
the spirit, a web based particle system. Since the particle buffer resides on the GPU, instanced rendering is necessary. Four different colors can be sent to the shader to be blended between eachother with the particles lifetime. Start and end size is also sent in this part and used with the lifetime to scale the particle.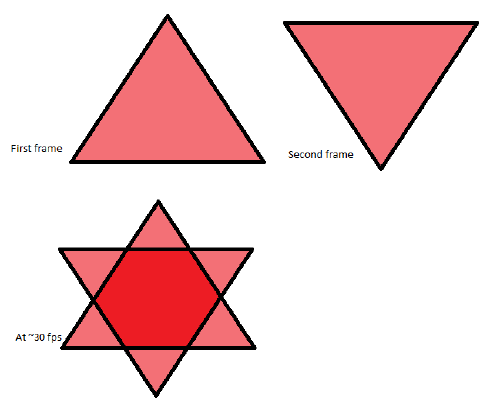
Reflection
This particles system was a fun and challenging task that required me to learn new techniques. Compute shaders, compute pipeline, different buffers and indirect instanced rendering to mention some. Communication and feedback from the team was important for the development. I could use that to fix bugs and create new functionality that team members found or wanted. For example when we added snow to a biome one member said that the snow didn’t move much. They mentioned vector fields and after researching it I implemented it and showed it again. This constant feedback was used through the whole project and not unique to the particle system. I would improve on this system by adding texture support and blur. When playtesting one tester thought that the flame effect (which used one particle system) looked like slush. By using animated textures with the particle system this could be improved. Another improvement would be to enable collision to objects and not only a ground y value.